
How to Make Money in Cast a Magnet
Last updated:
Keep valuable treasures earning visitor Cash at your base while you fish for better catches. Use rewards and surplus sales to fund the magnet or upgrade that improves your next catches.
Fill your display with useful treasures, update it with Bag → Treasures → Display Best, and keep fishing while visitors pay. Claim ready login, playtime and bounty rewards, then sell surplus catches to cover your next purchase. Buy a stronger magnet when weight blocks progress; invest in depth, reeling speed or starting Luck when those are the obstacle. Plan purchases before Rebirth clears your Cash.
Build Display Income While You Fish
Build two income streams together: catches and sales provide immediate Cash, while displayed treasures attract paying visitors. Keep improving the display as you collect better items, then sell treasures that no longer earn a place on it.
Choose your next purchase before selling or spending. A stronger magnet helps when catches exceed your lifting capacity; equipment upgrades improve starting Luck, diving depth or reeling speed. Keeping a clear purchase target prevents small upgrades from consuming the money needed for a larger improvement.
Start with Tutorial Cash and Ready Rewards
- Go to MAGNETS, open the magnet menu and use Claim Free for Rusty Magnet. Equip it and catch your first treasure at your base's Fishing Spot.
- Sell the tutorial catch. The tutorial awards an additional 50 Cash, separate from the treasure's sale payout. Follow the tutorial's purchase of the 50-Cash Luck upgrade to Level 2.
- Open Daily using the calendar icon and claim the available login reward. Day 1 gives 250 Cash.
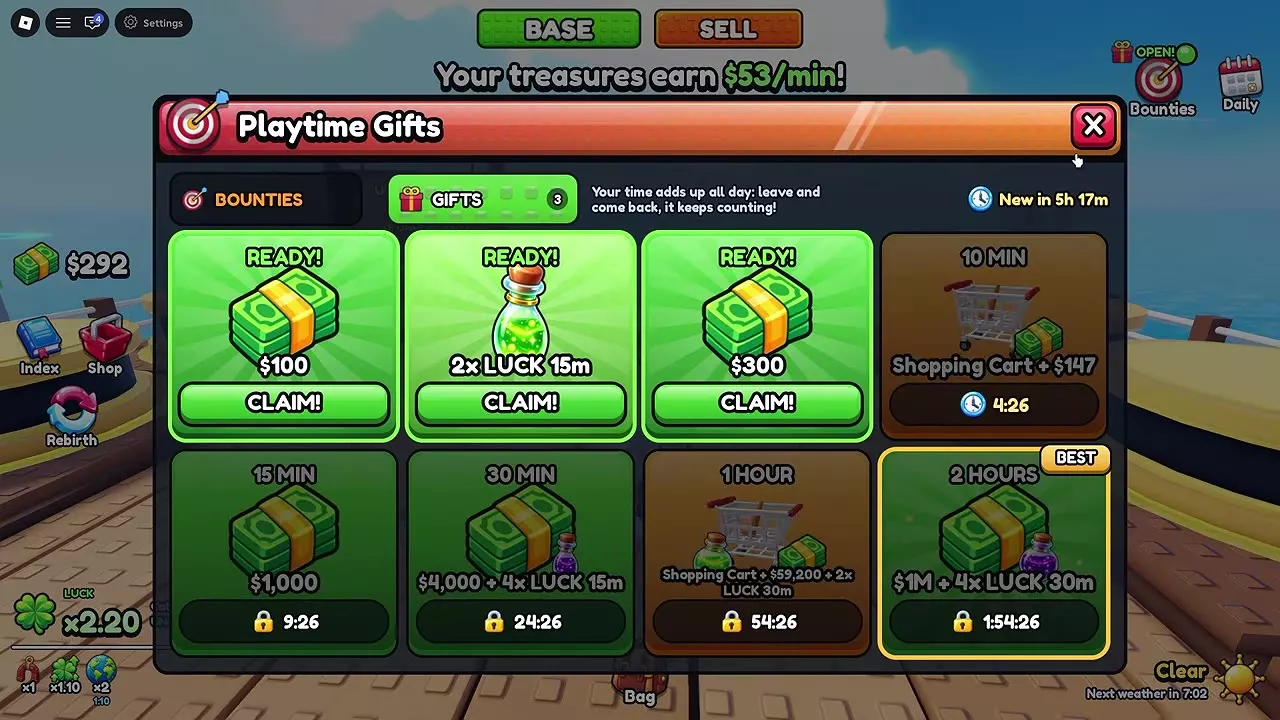
- Open the Bounties panel and select GIFTS. Press CLAIM on rewards marked READY. The 30-second gift gives 100 Cash; the one-minute gift gives 15 minutes of 2x Luck.
- Check BOUNTIES and work toward your assigned objectives while catching and selling. Claim each completed bounty, then claim the separate All 3 Bonus after all three bounty rewards have been collected.
Combine objectives wherever they overlap: catch treasures while progressing catch and discovery tasks, then sell surplus toward a selling objective. Follow the objectives assigned to you rather than selling useful exhibits solely to finish a task.
Playtime accumulates throughout the day, including across departures and returns. Treasure gifts also deserve attention: claim the item as well as its Cash, then update your display. The two-hour gift offers 1,000,000 Cash and 30 minutes of 4x Luck.
Use reward potions to support further catches. Joining the game's Roblox community also awards three free Luck Potions.
Fill and Improve Your Display
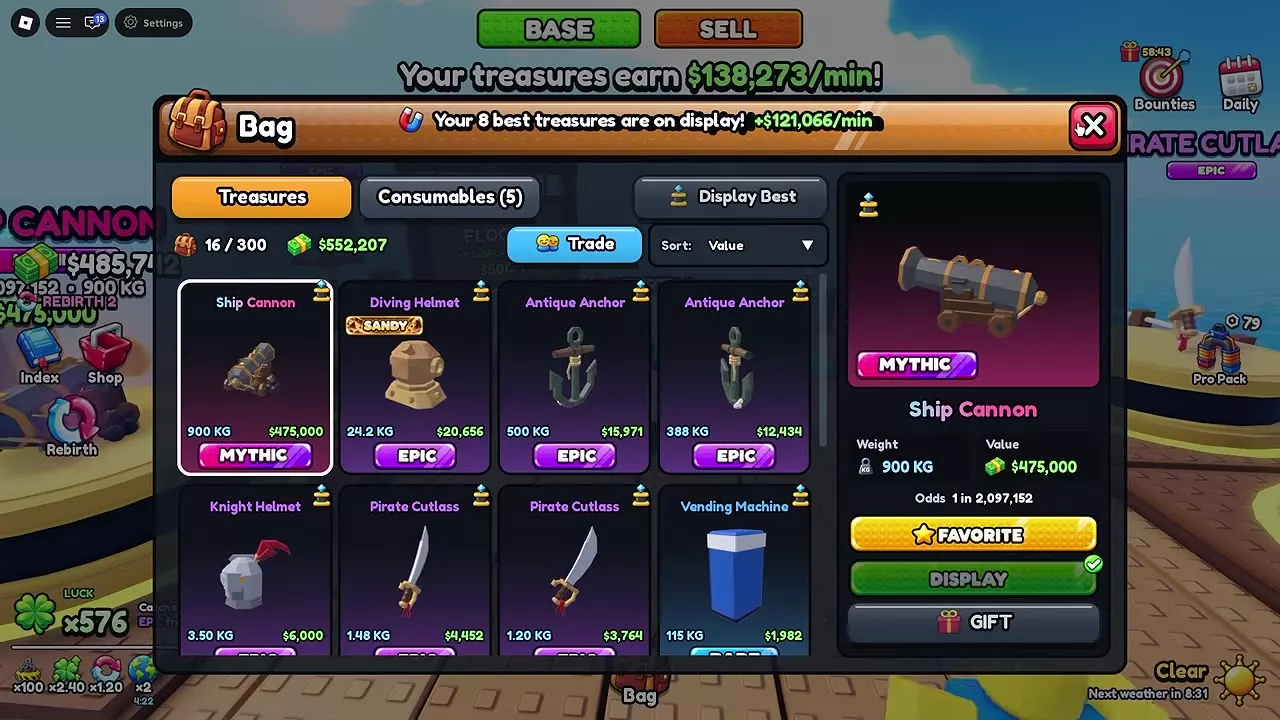
Open Bag → Treasures and choose Display Best to fill your available pedestals. The initial plot has eight display slots. Continue fishing while visitors pay to view your exhibits, then use Display Best again after valuable catches or treasure rewards.
Use Sort: Value to compare the individual treasures you own. Check Value, weight and mutation together: two treasures with the same name can have different values, and weight alone does not rank different treasure types. A mutated treasure's displayed Value already includes its mutation effect.
Reward treasures can make a substantial difference to the whole arrangement. In an eight-treasure setup, adding a 900 kg Ship Cannon worth 475,000 Cash and updating Display Best raised combined income from 17,207 to 138,273 Cash per minute—an increase of 121,066 Cash per minute. Those figures describe that arrangement's before-and-after income, rather than a fixed rate for every Ship Cannon.
Once the slots are full, replace weaker exhibits and sell the displaced surplus. Keep improving the contents of your existing slots before treating additional floor space as the next purchase.
Sell Surplus for the Next Purchase
- Update Display Best and Favorite any other treasures you want to keep. Displayed and favorited treasures are protected from sale.
- Use the top SELL button or visit the SELL stall and open Sell Treasure.
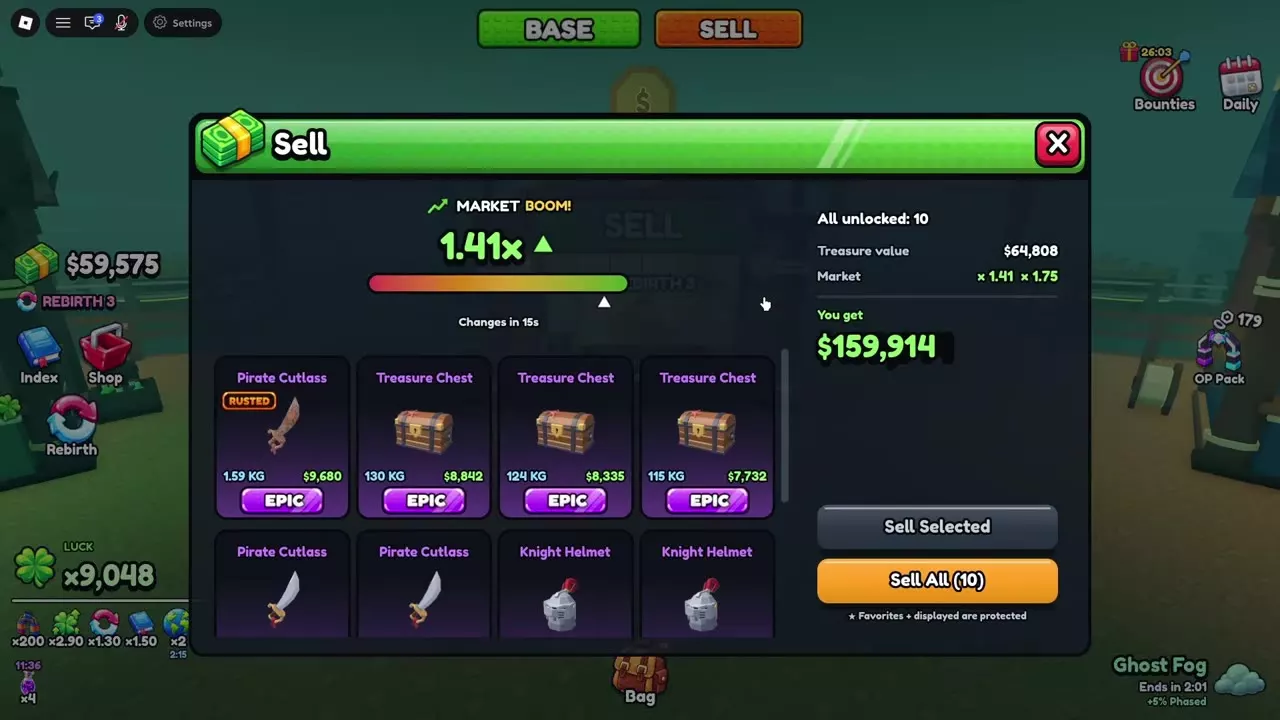
- Review the current Market multiplier and payout. Choose a particular treasure and use Sell Selected, or use Sell All for the eligible batch.
- Read and confirm the Epic-or-rarer warning when it appears during a bulk sale. Check SOLD for the actual payout.
If you have time to wait, hold surplus for a higher Market multiplier while your exhibits continue earning. With the same treasure value and Cash factors, a higher multiplier pays more. Read the current number and Changes in countdown: MARKET UP means the multiplier increased, so a rise from 0.72× to 0.80× still leaves it below 1×. The multiplier can change before settlement.
If a purchase will remove your current obstacle, sell enough surplus to cover its budget instead of waiting indefinitely. When the eligible count is zero, keep fishing or claim ready Cash rewards. Deliberately selling an exhibit requires removing it from its pedestal and clearing any Favorite protection first.
See selling and Market multipliers for the full sale process and payout calculation.
Spend on the Current Bottleneck
Choose a useful magnet jump
| Magnet | Price | Magnet Luck | Base Strength |
|---|---|---|---|
| Rusty | Free | 1× | 25 kg |
| Iron | 50 Cash | 6× | 60 kg |
| Steel | 300 Cash | 12× | 120 kg |
| Neodymium | 1,500 Cash | 25× | 250 kg |
| Heavy-Duty | 7,500 Cash | 50× | 500 kg |
| Industrial | 40,000 Cash | 100× | 1,000 kg |
After the tutorial, Iron is an inexpensive improvement over Rusty. If you already have 300 Cash, buy Steel directly rather than spending part of that budget on Iron first. The table uses base Strength; fully upgraded lifting capacity is a separate figure.
Beyond Neodymium, Heavy-Duty doubles both magnet Luck and base Strength. Industrial doubles those figures again. Buy Heavy-Duty when its added capacity addresses a weight obstacle; save toward Industrial when your current magnet still handles your catches. These purchases are budget choices, not a requirement to buy every intermediate magnet.
Match equipment upgrades to the problem
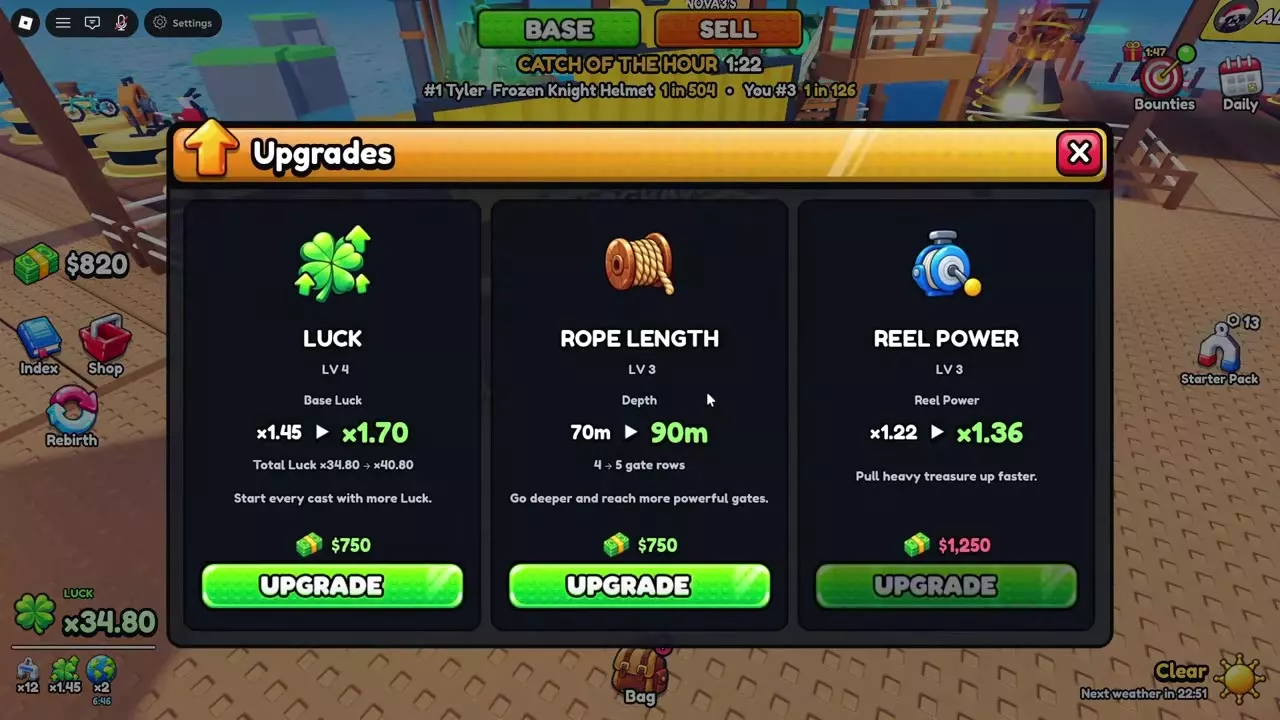
- More starting Luck: Luck Level 1 → Level 2 costs 50 Cash and raises Base Luck from 1× to 1.10×. Compare further Luck spending with the magnet purchase you are saving for.
- Deeper gates: Rope Length Level 3 → Level 4 costs 750 Cash, increasing depth from 70 to 90 m and gate rows from four to five. Check both depth and row count when choosing an upgrade.
- Slow heavy-treasure reeling: Reel Power Level 1 → Level 2 costs 100 Cash and raises reeling power from 1× to 1.10×.
- TOO HEAVY results: Save for a stronger magnet. Reel Power speeds up reeling; it does not replace the lifting capacity needed for an overweight catch.
Visit UPGRADES to buy the relevant level. If you are still catching successfully and the next magnet is your goal, keep its purchase budget instead of buying every affordable stat increase. Compare later levels in the equipment upgrades guide.
Prepare for Rebirth and Rebuild
- Check your next Rebirth's Cash requirement and the price and unlock requirement of your intended magnet.
- If you want an available magnet first, buy it before resetting, then rebuild enough Cash to meet the Rebirth requirement. For example, buying Electromagnet for 200,000 Cash before Rebirth 3 still leaves a requirement to hold 100,000 Cash for that reset.
- Keep useful treasures displayed. Purchased magnets and treasures remain through Rebirth, allowing the display to support your next round of purchases.
- Complete Rebirth, then use retained display income, new catches and surplus sales to rebuild the upgrades needed for your next catches. Luck, Rope Length and Reel Power restart at Level 1.
Rebirth 1 gives a 1.25× Cash multiplier, Rebirth 2 gives 1.5×, and Rebirth 3 gives 1.75×. Choose the reset when you want its bonuses and are ready to restore your upgrades. If your target magnet requires a higher Rebirth level, complete that reset first, then save its purchase price. See Rebirth requirements and timing for the full reset rules.
Expand capacity later
Floor 2 costs 500,000,000 Cash and adds eight display slots. Its Upgrade Plot sign is at the end of the base dock near Fishing Spot; use E: Buy Floor 2 when you are ready to invest in more capacity. Weigh that expense against continued magnet and equipment progression.
When returning after time offline, read Offline Earnings in the Welcome Back popup. That amount is the return-session payout; the display banner's Cash-per-minute or Cash-per-day number is an income rate.

Avoid Losing Your Progress Budget
- Account for the entire Cash reset. Rebirth clears your full balance, including the amount above its requirement. A Rebirth 2 reset with 24,065 Cash cleared the balance even though the requirement was 10,000 Cash. Invest in an intended, available magnet before resetting if you want to retain that purchase.
- Avoid expensive upgrade purchases immediately before Rebirth. Those levels return to Level 1. Spend on them when they serve catches you intend to make before the reset.
- Sell surplus before useful exhibits. Selling an exhibit gives immediate purchasing power but removes the treasure and its contribution to visitor income. If you choose to sell one, refill its pedestal with another treasure.
- Keep productive treasures instead of building an excess reset balance. Selling useful exhibits solely to hold more Cash before Rebirth gives up retained treasures while the resulting Cash is cleared.
Choose What to Keep and Upgrade
- Sell or display treasures: choose which individuals to retain and which to turn into purchase money.
- Base displays and income: place, swap or remove exhibits and manage display capacity.
- Which magnet to buy next: compare larger equipment jumps against your budget and lifting needs.
- Rewards: find the login, bounty and playtime reward you can claim or work toward next.